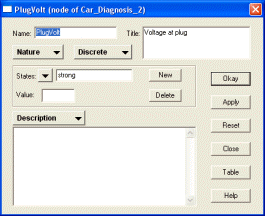
Purpose: You use the node dialog box to change the properties of a node (e.g. its name, or how many states it has). To change the way a node is related to its parents (e.g., its conditional probabilities), use the table dialog box instead, and to change the color of a node, see Node Coloring.
Obtaining: Double-click a node to obtain its node dialog box, or right-click on it and choose Properties, or select it and press the enter key. The latter method is very useful when adding new nodes to a net, since when a node has just been added it is already selected, and you just need to press enter.

The node dialog box can be used to set a node's:
• Name |
|
• Title |
|
• States |
Other Fields: At the bottom of the node dialog box is a text editing box, called the multipurpose box, within which you can view or change some other node properties, as chosen by the multipurpose selector.
Buttons: By pressing the ![]() selector, you can choose the node kind from
the options listed. If you click the
selector, you can choose the node kind from
the options listed. If you click the ![]() selector,
you can change the node from discrete
to continuous. Making a change within the dialog box does not
affect the node until the Apply
or Okay button is pressed (more info on the right-hand
buttons).
selector,
you can change the node from discrete
to continuous. Making a change within the dialog box does not
affect the node until the Apply
or Okay button is pressed (more info on the right-hand
buttons).
Multiple: You may have several
node dialog boxes on the screen at the same time, and you may alternate
between using different node dialog boxes and working directly in the
net window. Each node dialog box pertains to a single particular
node, but you can have more
than one of them for the same node.